
Changing a password in WHMCS depends on whether you are doing it on behalf of a user or if the user is doing it themselves.
Note that in recent versions of WHMCS (v8.0+), “Clients” are managed through “Users.” An admin can initiate a reset, but for security, WHMCS typically requires the user to set the actual password via an email link.
Admin Tutorial: Changing a Client’s Password
As an admin, you have two primary ways to handle this: sending a reset email (standard) or manually overriding it.
Method 1: Initiating a Reset Email (Recommended)
-
Log in to your WHMCS Admin Area.
-
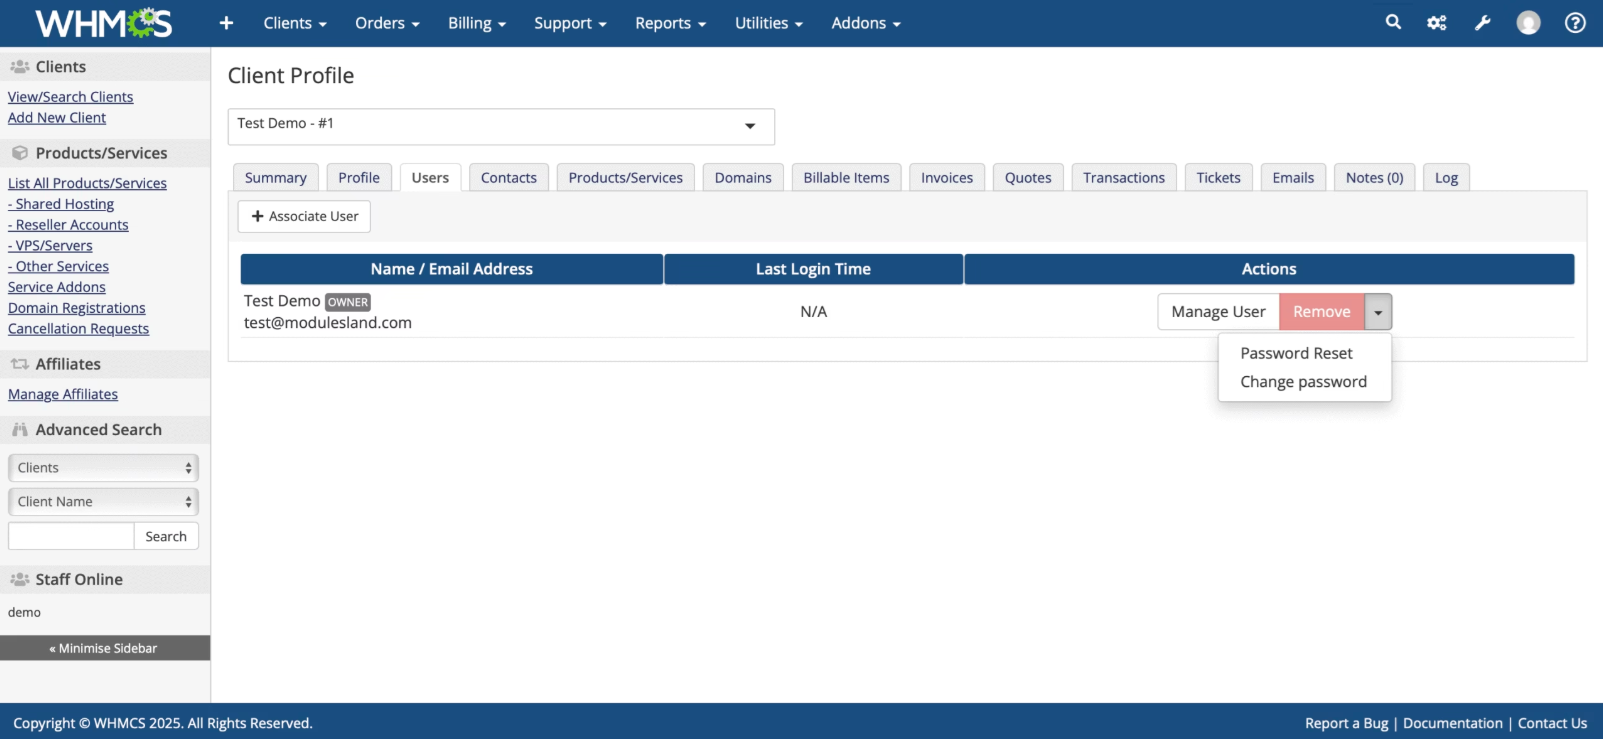
Go to Clients > View/Search Clients and select the specific client.
-
Click on the Users tab.
-
Find the specific user you want to reset.
-
In the Actions column, click the Manage User (three dots or arrow) and select Send Password Reset Email.
-
The user will receive an email with a link to choose a new password.
Method 2: Manually Setting a Password
-
In the client’s profile, go to the Users tab.
-
Click the arrow/manage icon and select Change Password.
-
Enter the New Password in the field provided.
-
Click Save Changes.
Note: If you don’t see this option, your WHMCS version may have restricted manual overrides for security. In that case, you must use the “Send Password Reset Email” option or a third-party “Password Change” module.
Client Tutorial: Changing Your Own Password
If you are a client logged into the portal, follow these steps to update your credentials.
If You Are Logged In:
-
Log in to the Client Area.
-
On the top navigation bar, click on Hello, [Your Name]! (or the user icon).
-
Select Change Password from the dropdown menu.
-
Enter your Existing Password.
-
Enter and confirm your New Password.
-
Click Save Changes.
If You Forgot Your Password:
-
Go to the Client Area Login Page.
-
Click the Forgot Password? link below the login form.
-
Enter your registered Email Address.
-
Check your email for a reset link (check Spam if it doesn’t arrive within 5 minutes).
-
Click the link and enter your new password.
Would you like me to help you draft an email template you can send to your clients explaining how they can reset their passwords?
- Locate the Client: Log in to your Admin Area and go to Clients > View/Search Clients. Select the specific client.
- Access the Users Tab: Inside the client’s profile, click on the Users tab.
- Initiate Password Change: Find the user in the list. Click the down arrow icon in the Actions column and select Change Password.
- Enter New Password: Type the new password into the field provided.
- Save Changes: Click Save to apply the new credentials.
- Log In: Access your Client Area using your current credentials.
- Navigate to Security: Go to the Hello, [Name]! dropdown menu and select Security Settings (or “Change Password” depending on your provider’s template).
- Update Password: Enter your Existing Password, then type and confirm your New Password.
- Save: Click Save Changes.
- Request Reset: On the Client Area login page, click Forgotten Password.
- Verify Email: Enter your registered email address. The system will send a confirmation link valid for two hours.
- Set New Password: Click the link in the email to reach the validation page and enter your new password.